|
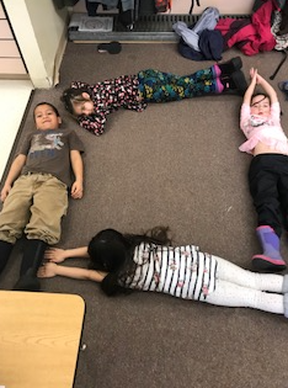
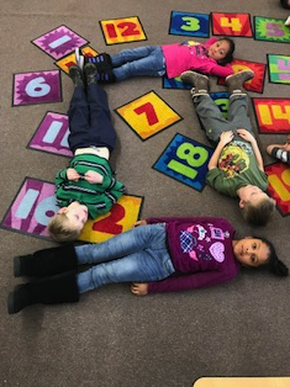
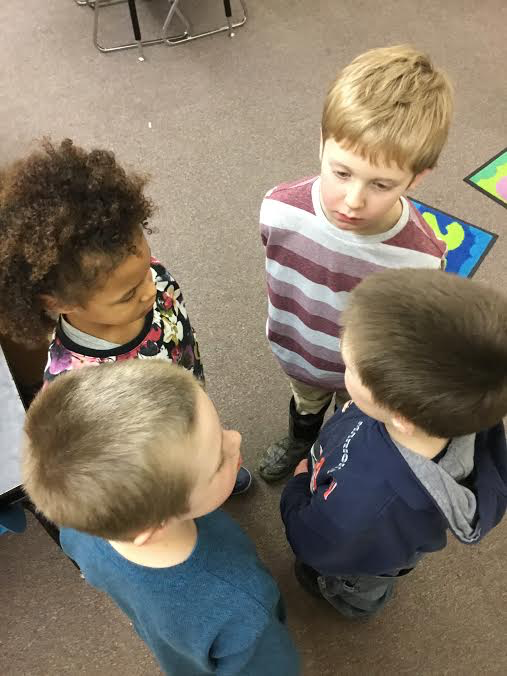
by Katy Goodell 1st Grade, Riverbend Elementary 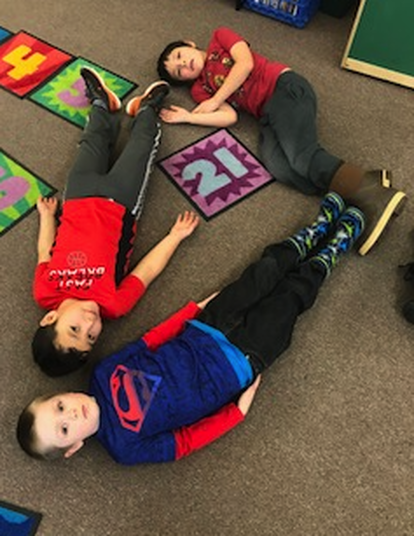 ,Artful Teaching has become part of every day in the classroom. Whether it’s the vocabulary I’m using, a thinking routine, the actors toolbox, or tableaus, some part of each of our day involves techniques and skills I have acquired this year through this amazing opportunity. I have decided to share some pictures of some things I have done in my classroom using tableaus. I personally believe that handing students a paper and pencil doesn’t actually show all that they can do, especially when it comes to assessments. So, this year I chose to use tableaus as formal and informal assessment tools. In these first three photos you see students laying on the floor in different shapes. We went through the actors toolbox then dove into some tableau work with plane shapes. During this time, students were learning all about different kinds of shapes in math. I used this time to include some tableau work to assess how the students were understanding sides, vertices, and angles.
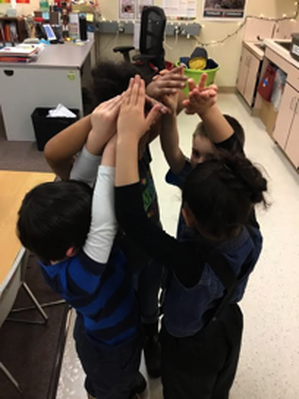
You will notice that all three tableaus are on the ground. One of the characteristics of a tableau is that there are levels. Students seemed to really struggle through figuring out how a plane shape could have different leveles. They were so stuck on the fact that it’s two dimensional and the fact that they see these shapes as something flat. Next year, when I go through these lessons again, I really want to discuss in depth that just because a plane shape is flat doesn’t mean it has to be flat on top of a surface. It was really interesting to see the students struggle through this. When we debriefed after our tableau work, students were surprised and seemingly caught off guard when I brought this to their attention. This made me reflect a bit on my teaching during these lessons. It showed me that I didn’t explain that just because it’s a plane shape, it doesn’t mean that it has to be “flat on the ground.” With all of that being said, the kids were still successful during this process and they weren’t using a pencil and a piece of paper. They were reflecting on the different attributes of plane shapes and discussing how they could create those shapes as a team. Each team was able to create a plane shape without support from anyone other than their own team. It was fun to watch them go through Think, Share, Plan, and Create. They could make it through Think and Share, but once we got that far, they were so excited to plan and then create that most of them would just start it. I had a hard time with that at first. I couldn’t decide if it really was appropriate to stop them when they were so excited to learn and create together. But I quickly got over that because it caused more issues than success. Throughout the year I have gotten more and more comfortable with the tableau process, which has me extremely excited for D.C. and next years implementation! 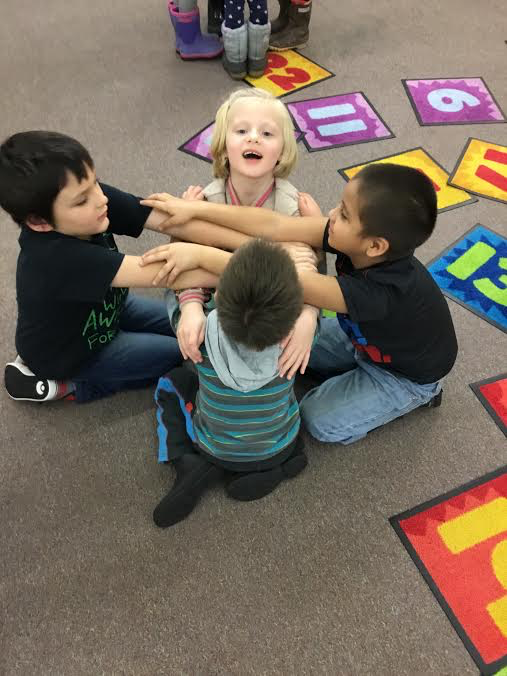 In the next set of photos, you see students at different levels. You also see students being assessed once again. It was so great to have a tool to use this year aside from a paper and pencil. This second set of photos was taken during my formal observation earlier this year when my principal came in to observe. I had been talking about Artful Teaching and how much I had been enjoying spending some of my time outside of school at these amazing workshops when my principal said, why don’t you show me what you have been doing… There are so many times where I feel that we as teachers feel like we have to show what we are doing with the curriculum and our implementation of it, that we forget there is an art form to teaching. Artful Teaching has helped me express my teaching art form in ways that I don’t think I would have come up with on my own. During this lesson, my students were being assessed on what they had learned through the week about solid shapes. They had to consider the faces, verticse, sides, and angles. This was a very challenging lesson and assessment tool. We had done quite a bit of work with our foam solid shapes, and I knew my students had learned and understood quite a bit about the attributes about solid shapes, but they honestly blew me away during this assessment. Each group went through Think, Share, Plan, and Create. Through out this process, I was walking around listening to the different thoughts and plans they had. Their consideration for all of the attributes of these shapes were amazing. This really gave then the opportunity to think about the shapes that each solid shape have within them. As I walked around the room I heard groups discussing how the cube has square sides and how a pyramid has a square base. These are things that we had discussed but when they actually had to apply those attributes to a real life creation of these shapes, they had to think more deeply about what each shape really looks like.
Some groups were more successful than others. I found that students had a hard time deciding if the attributes that one friend had shared were actually true in regards to the solid shape they had chosen to create. It was also hard for students to decide what each person was going to do. They were all so excited about what they had learned that they wanted to play every part.
We did these tableaus a few different times so each group had an opportunity to create different shapes. As we continued the work, the tableaus got more and more detailed. I am so grateful for the opportunity to be part of such an amazing experience. I have grown so much as an educator and I can’t wait to continue this experience next year with my peers and my students.
0 Comments
by Tennie Bentz Dzantik'i Heeni Middle School, 7/8th grade 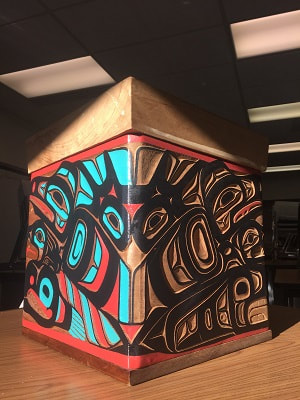 Bentwood Box created by Leroy Hughes Eighteen primarily Alaska Native students enter the classroom full of energy on this fall afternoon. Most of them struggle in math and it is the last class of the day, so no one is ready to buckle down to learn about measurement, surface area, volume, symmetry, or ratios and proportions. Then Ruby Hughes, our Cultural Specialist, brings in the most beautiful Bentwood Box any of us have ever seen. It is large, approximately 24 inches on each side. Intricate formline designs are carved on two sides and painted on the other two. The students settle down a bit and I start to hear sounds of excitement as they begin to look at and touch the box. They are hooked. Not only are they in the presence of a masterpiece, they are about to create their own. Students settle into their seats with the Bentwood box at the center of the room. We begin the I See, I Think, I Wonder thinking routine and discuss what students see when they look at the box. What makes this box so beautiful? Is it the size, the shapes, the colors, the symmetry? Groups look closely at the box and explain how they think the box was built. Some of our students have built one before so they can help explain the process to others. Many students wonder how they will ever be able to complete something so complicated. Step by step, we tell them. It’s going to be a long process, but in the end they will have a tangible item that they will be able to give as a gift or keep as a memory of the challenge to come. 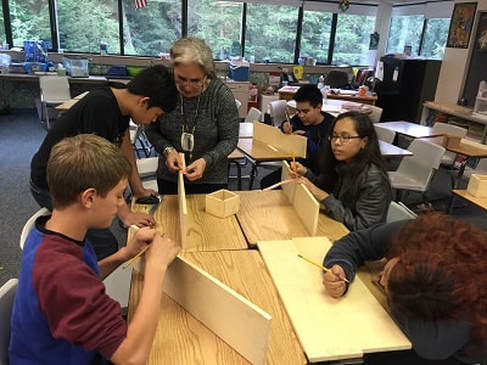 A couple of days later, Ruby brings each student their own rectangular piece of yellow cedar from Hoonah. Sealaska Heritage Foundation helped cover the cost of the cedar which is fairly expensive. Ruby explains the importance of precise measurement and we show students examples of boxes that were square and others that are not. Students see the beauty in symmetry. Perfectly bent corners, straight lines, tops proportional to the bottoms. Armed with a ruler, pencil and their new knowledge of measurement, students begin measuring precisely to ¼ and ⅛ and even 1/16 of an inch. Some of the students fly along, making their measurements while others fall behind. One girl starts to wander about the classroom bothering others. At first she won’t tell me why she is wandering and then I realize, she doesn’t know how to read her ruler. She’s never been asked to measure something so precisely, especially when mis-measuring by something as small as ⅛ of an inch will end up creating a box that is no longer symmetrical and square. This young lady would rather give up than end up with a less than perfect product. I convince her to sit back down and together we began to measure. We create a template because remembering which line is which on the ruler is too difficult for her on this day. Soon she has her measurements complete, her corner angles drawn correctly and the rest of the class finishes soon after. 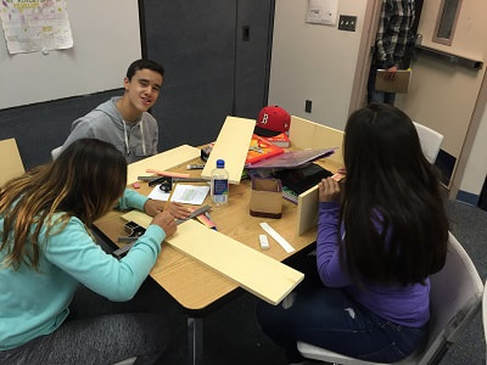 The project flies by. Day after day as students saw, sand, and chisel their way towards a final project. Ruby works patiently guiding half of the students through the process of building their boxes. I work with the other half of the class tying in the math behind the art. We learn about surface area by creating wrapping paper and volume by filling the example boxes with cubes. Fractional measurements are converted to decimals and percents. Standard systems of measurement are converted to metric. On and on the math goes with students always excited to stop with the math so they can just go work on the art. 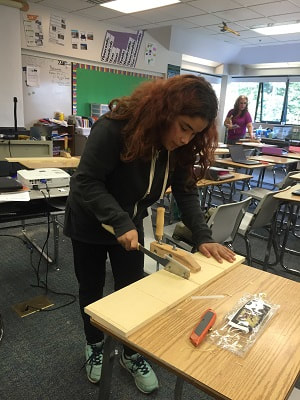 Soon the boxes take shape. Ray Watkins visits Dzantik’i Heeni and he and Ruby take a few kids at a time downstairs to steam and bend the boxes into their square shape.The other students wait impatiently with me. They want to see if all of their precise measurements and persistence sawing and chiseling have paid off. Will their final product have the lines of symmetry and the perfect bends in the corners? Soon students begin to carry the boxes back upstairs, smiles on their faces. Most of the boxes are nearly perfect, a few aren’t quite square but Ruby is sure that she and Ray can magically fix them overnight. The next day, when the students return, everyone has a perfect box. Soon the students began new measurements to create perfectly fitting bottoms and proportional tops. The boxes were nearing completion for many students. The experience of building their own Bentwood box was enough. Others however wanted to take the box further and create their own formline design to put on the outside. 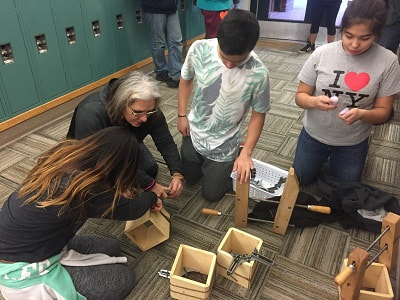 We spent some time looking at the Colors, Shapes and Lines on the masterpiece Bentwood Box that had served as our inspiration through this entire process. The colors were few but bold. Red, black, teal and natural wood. Ruby taught us the names and relationships between the shapes. Ovoids serve as the center from which U-shapes extend. We learned that the shapes rarely stand on their own, but connect and flow from one form to another. To me this was the perfect analogy for how math should be taught. Fractions should not stand on their own, there needs to be flow, a relationship and connection between the math and real life application. This was the perfect opportunity to teach ratios, proportions, similar and congruent figures and lines of symmetry through art. Ruby taught the students how to make ovoids using lines of symmetry and I created an activity where they had to measure the height and width of the ovoids and then create new ovoids that were similar using ratios and proportions. Most of the students ended up with a set of ovoids that they could use as a template when creating the formline design on their boxes. Some students quickly realized that they could avoid the math and just draw ovoids within ovoids to create their template. Whichever method students chose to use, the concept behind math supporting art was cemented. 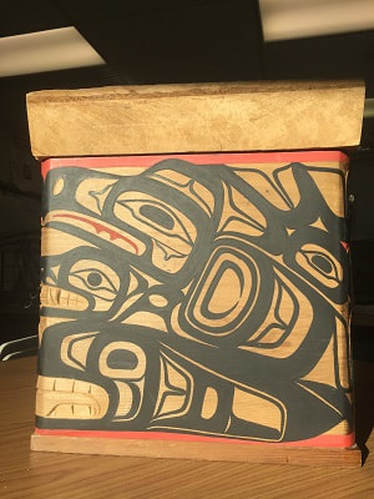 Students are still working on their formline designs. One young lady is trying to get in touch with her grandparents to learn more about her lineage so she can put the correct clan crests on her box. She is an inspiration to me and reinforces the need for more projects like this one. She doesn’t do much in math class and did very little of the work when we worked with the math behind the art. Some may call this a failure of the project when looking at it from a math perspective but this student is so proud of the masterpiece that she created that she is taking the time to make sure the connection to her family’s history is accurate. She plans to give her box to her grandmother in Angoon. That in itself proves the project was successful in my eyes. Acknowledgments:
I owe a huge thank you to Ruby Hughes. Her calm presence and patience was an inspiration through this process. Without Ruby’s help and support, this project would have been a disaster. Ray Watkins’ help behind the scenes made this project streamlined and successful as well. Thank you to Sealaska Heritage Institute for your generous support providing the yellow cedar and to the Artful Teaching grant for purchasing colored pencils for the final box designs. By Marnita Coenraad 3rd Grade, Riverbend Elementary School 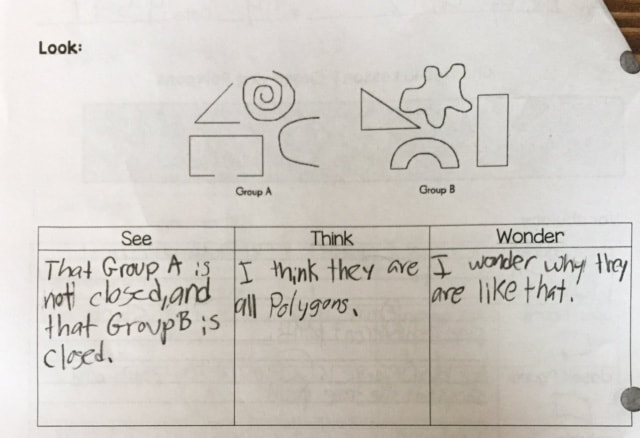 As I began my Artful Teaching journey last year, I was excited to find how seamlessly I was able to integrate Artful Thinking routines into my literacy instruction. I found that Reading Portraits added depth of knowledge to our reading of biographies, and art seem to provide an entry point for struggling readers. This year that trend continued with our study of tableau. As I became more familiar with the routines, I branched out and used them in science and social studies as well. But even as I experimented with these new content areas, I found that bringing the routines into my math instruction was more challenging. I made it a goal for the spring semester to bring Artful Teaching to my math lessons. For each new math lesson, I create a guided notes sheet. These notes serve as guide through the lesson, as well as a reference that can use when completing their independent practice or homework. I decided that I would include a thinking routine at the beginning of each math lesson. I hoped that this would stimulate thoughtful discussions and promote student discovery of mathematical concepts. The following is an introduction to geometry lesson. I used the thinking routine “See, Think, Wonder” to help students discover characteristics of open/closed shapes, polygons, and special quadrilaterals. 1. Students started by looking at groups of open and closed shapes. I did not give them any indication as to why shapes were grouped in this way. Students then completed at least one entry for See, Think, and Wonder. I did not ask students to write in complete sentences for this exercise. You can see that students entered the lesson with varying degrees of prior knowledge. 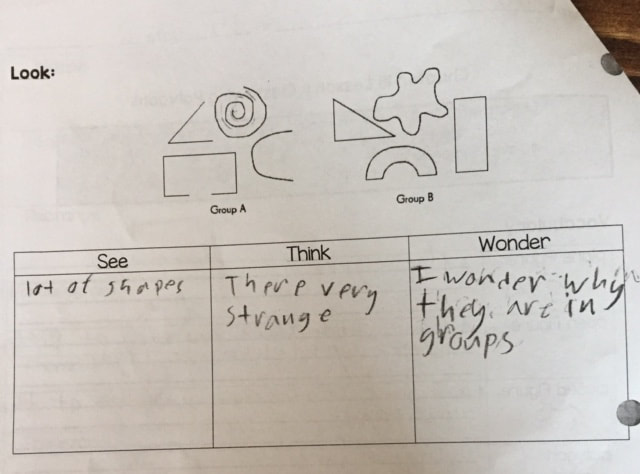 2. After some direct instruction in open versus closed figures, students repeated the thinking routine with two more groups of figures. I was happy to see that immediately began experimenting with the new vocabulary introduced during the lesson. Again, some students were already familiar with geometry vocabulary, while others were engaging with it for the first time.  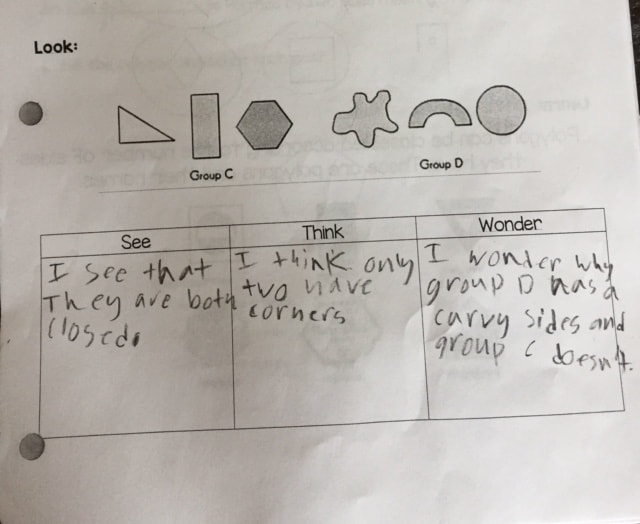 3. After direct instruction in naming polygons and their parts. We repeated “See, Think, Wonder” for a final time. Students again used the new vocabulary in their observations and inferences. Several students noticed that some of the shapes were line drawings, or “random” shapes, and some were “real,” meaning photographs. This breaking into two groups was an unexpected result of my having two groups in the previous two routines. I had hoped that students would notice they all had four sides. 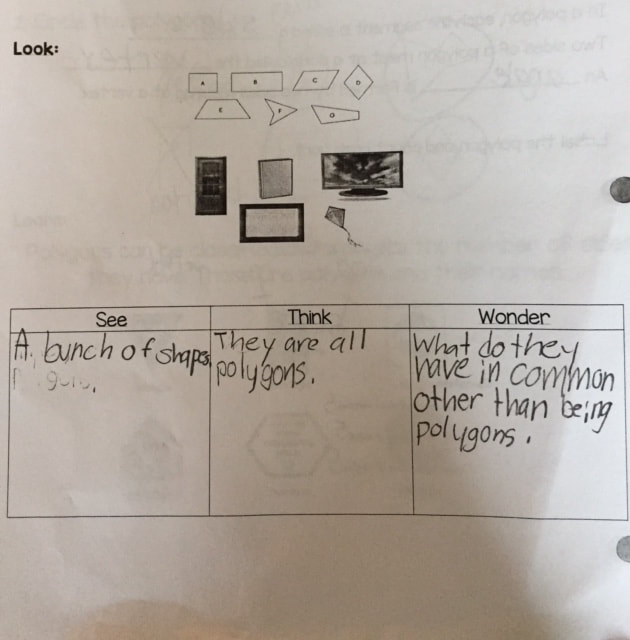 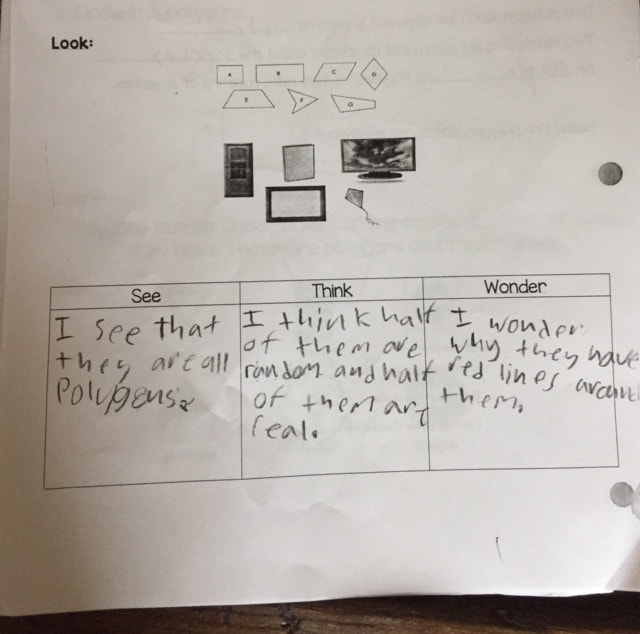 Although there were a few misconceptions along the way. I was happy that students were able to construct their own definitions for open shape, closed shape, and polygon. With help, we also discovered the characteristics of special quadrilaterals like rectangles, parallelograms, and trapezoids. I have taught similar geometry lessons that are vocabulary rich, and it can be difficult to get students to engage with the new words and their meanings. Teaching this lesson through the Artful Thinking routine encouraged students to construct their own definitions and provided a safe space to try out their new vocabulary terms. Since this lesson, we have used the art of Kandinsky and Mondrian to identify and name 2-dimensional figures. Students are highly motivated to find and share the shapes they see.
I am continuing to experiment with using art in my math instruction. I recently used Navajo blankets to review symmetry and introduce area. While arts integration in math does not come as naturally to me as in other subjects, I am enjoying the challenge. More importantly, I see students participating in class who are usually reticent to volunteer in math discussions. Since we teach art terms throughout elementary, I have found that students are comfortable analyzing and discussing art. The consistency of thinking routines coupled with the familiarity of art has made math more accessible and enjoyable for many of my students. |
ArtStoriesA collection of JSD teachers' arts integration classroom experiences Categories
All
|
 RSS Feed
|
|
Artful Teaching is a collaborative project of the Juneau School District, University of Alaska Southeast, and the Juneau Arts and Humanities Council.
|