|
by Tennie Bentz Dzantik'i Heeni Middle School, 7/8th grade 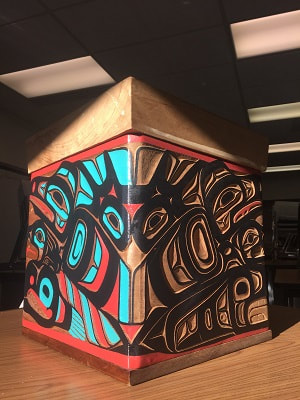 Bentwood Box created by Leroy Hughes Eighteen primarily Alaska Native students enter the classroom full of energy on this fall afternoon. Most of them struggle in math and it is the last class of the day, so no one is ready to buckle down to learn about measurement, surface area, volume, symmetry, or ratios and proportions. Then Ruby Hughes, our Cultural Specialist, brings in the most beautiful Bentwood Box any of us have ever seen. It is large, approximately 24 inches on each side. Intricate formline designs are carved on two sides and painted on the other two. The students settle down a bit and I start to hear sounds of excitement as they begin to look at and touch the box. They are hooked. Not only are they in the presence of a masterpiece, they are about to create their own. Students settle into their seats with the Bentwood box at the center of the room. We begin the I See, I Think, I Wonder thinking routine and discuss what students see when they look at the box. What makes this box so beautiful? Is it the size, the shapes, the colors, the symmetry? Groups look closely at the box and explain how they think the box was built. Some of our students have built one before so they can help explain the process to others. Many students wonder how they will ever be able to complete something so complicated. Step by step, we tell them. It’s going to be a long process, but in the end they will have a tangible item that they will be able to give as a gift or keep as a memory of the challenge to come. 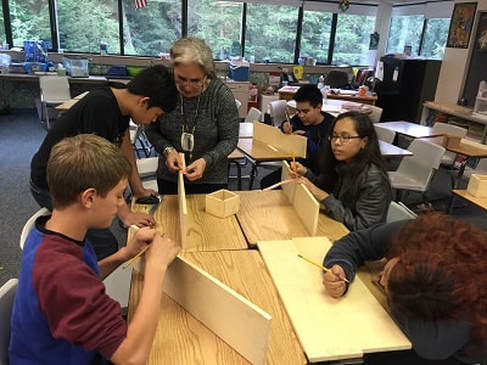 A couple of days later, Ruby brings each student their own rectangular piece of yellow cedar from Hoonah. Sealaska Heritage Foundation helped cover the cost of the cedar which is fairly expensive. Ruby explains the importance of precise measurement and we show students examples of boxes that were square and others that are not. Students see the beauty in symmetry. Perfectly bent corners, straight lines, tops proportional to the bottoms. Armed with a ruler, pencil and their new knowledge of measurement, students begin measuring precisely to ¼ and ⅛ and even 1/16 of an inch. Some of the students fly along, making their measurements while others fall behind. One girl starts to wander about the classroom bothering others. At first she won’t tell me why she is wandering and then I realize, she doesn’t know how to read her ruler. She’s never been asked to measure something so precisely, especially when mis-measuring by something as small as ⅛ of an inch will end up creating a box that is no longer symmetrical and square. This young lady would rather give up than end up with a less than perfect product. I convince her to sit back down and together we began to measure. We create a template because remembering which line is which on the ruler is too difficult for her on this day. Soon she has her measurements complete, her corner angles drawn correctly and the rest of the class finishes soon after. 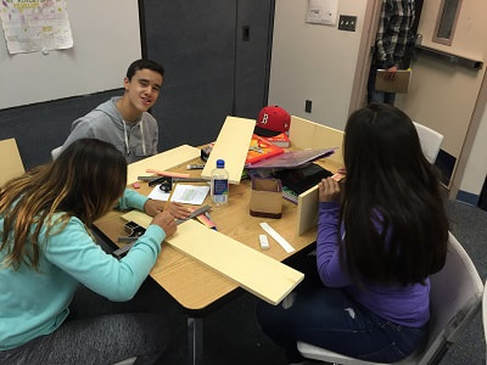 The project flies by. Day after day as students saw, sand, and chisel their way towards a final project. Ruby works patiently guiding half of the students through the process of building their boxes. I work with the other half of the class tying in the math behind the art. We learn about surface area by creating wrapping paper and volume by filling the example boxes with cubes. Fractional measurements are converted to decimals and percents. Standard systems of measurement are converted to metric. On and on the math goes with students always excited to stop with the math so they can just go work on the art. 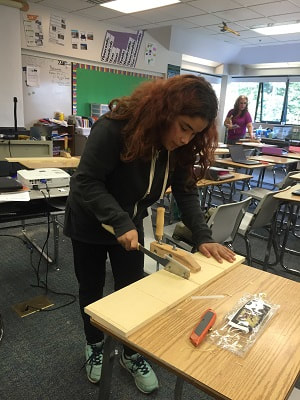 Soon the boxes take shape. Ray Watkins visits Dzantik’i Heeni and he and Ruby take a few kids at a time downstairs to steam and bend the boxes into their square shape.The other students wait impatiently with me. They want to see if all of their precise measurements and persistence sawing and chiseling have paid off. Will their final product have the lines of symmetry and the perfect bends in the corners? Soon students begin to carry the boxes back upstairs, smiles on their faces. Most of the boxes are nearly perfect, a few aren’t quite square but Ruby is sure that she and Ray can magically fix them overnight. The next day, when the students return, everyone has a perfect box. Soon the students began new measurements to create perfectly fitting bottoms and proportional tops. The boxes were nearing completion for many students. The experience of building their own Bentwood box was enough. Others however wanted to take the box further and create their own formline design to put on the outside. 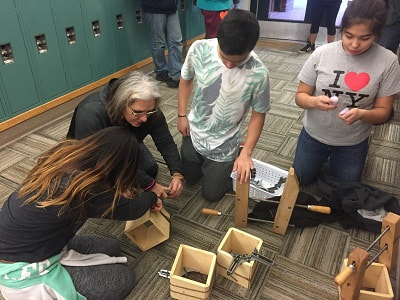 We spent some time looking at the Colors, Shapes and Lines on the masterpiece Bentwood Box that had served as our inspiration through this entire process. The colors were few but bold. Red, black, teal and natural wood. Ruby taught us the names and relationships between the shapes. Ovoids serve as the center from which U-shapes extend. We learned that the shapes rarely stand on their own, but connect and flow from one form to another. To me this was the perfect analogy for how math should be taught. Fractions should not stand on their own, there needs to be flow, a relationship and connection between the math and real life application. This was the perfect opportunity to teach ratios, proportions, similar and congruent figures and lines of symmetry through art. Ruby taught the students how to make ovoids using lines of symmetry and I created an activity where they had to measure the height and width of the ovoids and then create new ovoids that were similar using ratios and proportions. Most of the students ended up with a set of ovoids that they could use as a template when creating the formline design on their boxes. Some students quickly realized that they could avoid the math and just draw ovoids within ovoids to create their template. Whichever method students chose to use, the concept behind math supporting art was cemented. 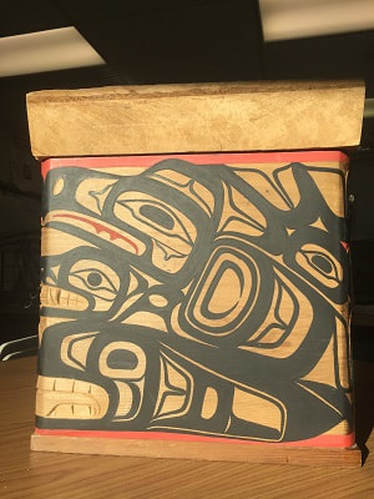 Students are still working on their formline designs. One young lady is trying to get in touch with her grandparents to learn more about her lineage so she can put the correct clan crests on her box. She is an inspiration to me and reinforces the need for more projects like this one. She doesn’t do much in math class and did very little of the work when we worked with the math behind the art. Some may call this a failure of the project when looking at it from a math perspective but this student is so proud of the masterpiece that she created that she is taking the time to make sure the connection to her family’s history is accurate. She plans to give her box to her grandmother in Angoon. That in itself proves the project was successful in my eyes. Acknowledgments:
I owe a huge thank you to Ruby Hughes. Her calm presence and patience was an inspiration through this process. Without Ruby’s help and support, this project would have been a disaster. Ray Watkins’ help behind the scenes made this project streamlined and successful as well. Thank you to Sealaska Heritage Institute for your generous support providing the yellow cedar and to the Artful Teaching grant for purchasing colored pencils for the final box designs.
0 Comments
Observations by Becky Engstrom 3-5th Grade TED Specialist, Gastineau and Harborview Schools BACKGROUND As a specialist serving intermediate students grades 3 through 5, I have always rotated language arts units on a 3-year basis to be sure students are offered an eclectic mix of content supported by lessons to improve reading and writing skills. One of my favorite units has always been an art biography unit. Students would do research on an artist collecting pertinent facts by taking notes. They would use the notes to write a three paragraph report on their chosen artist. They would write haiku poetry about their artist and the art work. They would create a piece of work combining their artist’s style and beliefs with their own, then they would support the piece they created with a description explaining their reasoning behind their work of art. All these parts are then mounted on a poster board which has always made for a beautiful display.  CHANGE After signing up and committing myself to the study of Artful Teaching, the first thing I wanted to do was change this unit to create more opportunities for authentic artful thinking using a variety of thinking routines from different thinking dispositions. I experimented with a selected artist to experience different routines that would help students when they finally selected the artist they wanted to study. I chose Frederic Remington to learn and model different thinking routines. We did a verbal See/Think/Wonder in table groups with different Remington pieces, then used the same pieces to do a verbal Beginning/Middle/End. We experienced Step Inside with a work from Remington. We studied desert vocabulary (mesa, plateau, canyon, butte, saguaro, ocotillo, etc.) and used that vocabulary to create tableaus. ON THEIR OWN After students selected their artist, gathered notes, and wrote their report, I selected a piece from their artist, printed it out, and students wrote their See/Think/Wonders on the printout. Students also selected a piece from their artist that they wanted to attempt to turn into a Tableau (step inside). The student who selected their piece would become the tableau director and had to put people in position until they were satisfied with the outcome. It gave me a good understanding of which students had excellent communication skills and which students needed improvement. It also helped me see the students who noticed many details and the ones who did not. I would have to bring focus to areas in the piece with questions… “What direction are they looking?” “What is their hand doing?” The amount of information I received from this one activity was a true eye-opener! Students also extended their thinking by creating a piece of art that connected their own thinking to the artist they were studying. CRITIQUING AN ARTIST Students wrote a research paper on the artist they picked. The last paragraph was their opinion of the artist they selected. I especially enjoyed reading these paragraphs. NEW PROJECTS DISPLAYED IN RETROSPECT
Although I believe the old poster board displays were more visually pleasing and beautiful, the new displays showed more artful thinking; the most beautiful moment to catch is proof of a brain in action. Whereas the old displays had more writing skills involved, the new supported the process by which learning took place. It was inspiring to watch the students make incredible observations. To listen to the details noticed to create the tableaus was a treat. To read their observations of the students’ chosen artist was deeply satisfying. Teaching became more passive, as if I handed the wheel to the students because they were ready to drive. It’s scary, and wonderful at the same time. By John Wade 7th Grade ELA, Floyd Dryden Middle School by Michaela Moore JDHS, ELA & Drama 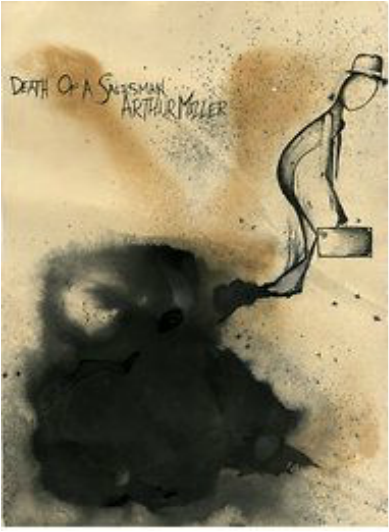 Poster by Ashley Butler, Parsons the New School of Design To introduce the play, Death of a Salesman by Arthur Miller, I first put an image from a poster of the play on the overhead and had the students go through the Thinking Routine of SEE/THINK/WONDER:
After this Thinking Routine, I asked the students to complete a Crowdsourcing activity about Arthur Miller. The students found information quickly about Arthur Miller and came up and wrote in a word splash on the whiteboard fun and important facts. We took a few moments to discuss surprises and interesting facts found in table groups and in whole group. Then I asked the students to prepare for notes: I introduced the 4 main characters from Death of a Salesman to students and asked them to choose one character that they would focus on in their project and notes. I instructed the students to write anything important down about the character (personality, weaknesses, strengths, choices, goals, motivations, etc) while we watched the play. After we finished watching and discussing the play, I passed out the text of the play and asked the students to fill in holes in their notes about their characters AND to add important quotes said by their characters, or important quotes others said about their characters.  Once, these notes were complete, I taught the students step by step how to draw a caricature of their character beginning with a sketch first and then moving into their final draft. We first discussed the idea of caricatures and how they were different from real portraits or pictures. We discussed the symbolic nature of caricatures. (Learned from work of Richard Jenkins).
 2. Show the students how to draw a caricature from lines, shapes, and patterns and have them draw your example, and have them rough draft sketch out a caricature of their Death of a Salesman chosen character.  3. Show the students how to turn their sketch into a real caricature of their chosen character. 4. I showed the students how to do Richard Jenkins’ inking technique (using sharpie to outline your pencil drawing) and then coloring technique (how to use colored pencils to get different shades and different textures) and shared with the students Richard Jenkins’ helpful handouts on hair and faces.
by Carly Lehnhart Glacier Valley Elementary, 2nd grade
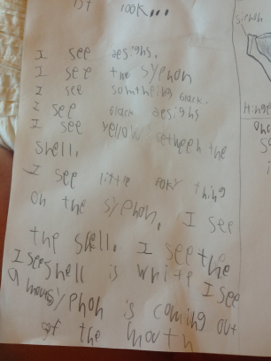
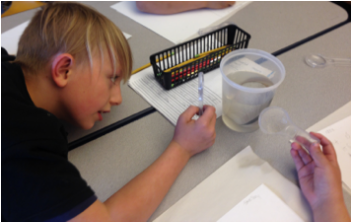
Artful Thinking has become such a natural part of my teaching. I have found that it sneaks its way into everything. I continue to be amazed at the engagement and effort that my students put in during and after a Thinking Routine. It brings the focus back to the process and emphasizes curiosity and critical thinking skills, which are two things that I strive to facilitate. One way in which Artful Thinking has made a huge impact for me and my students is in science. I have always used science notebooks as a way of recording our observations and findings, but this year, they have been a lot more successful. I am realizing that Artful Thinking is what I have to thank for that. My students are structuring their observations and notes in ways that are mirroring and combining a lot of the routines that we have tried. Without leading them in a formal routine, I find that they are using the language that has been modeled when they make notes in their science notebooks. Woohoo! I have been loving using Artful Thinking as an introduction to a unit to spark interest and identify our background knowledge, as well as at the end of units as assessments. This specific lesson was kind of in the middle. My students had just been to DIPAC to learn about mollusks. They had been introduced to what a clam was, gotten to see one, and had an overview of the parts. A couple of days later, a parent showed up in the morning with a bucket full of clams and asked if I wanted to use them. I obviously threw out the old plans and quickly came up with an idea of how to use them in my classroom. Artful Thinking immediately came to mind. I started out with a See/ Think /Wonder with this picture. This is a routine that we do A LOT. 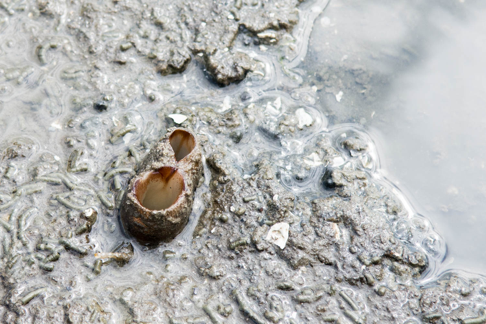
I started the lesson doing a Looking 10 x 2 Thinking Routine. They immediately forgot about the picture, because a live clam on your table is way more interesting. 1st look: Quick and simple. They had about 3 minutes to write down words, phrases, or sentences about the clam in front of them. Some second graders struggled with this, so it turned out to be more like 5x2 for some. Here is an example of one students 1st look:
 By Katy Ritter Gastineau Elementary, 4th Grade 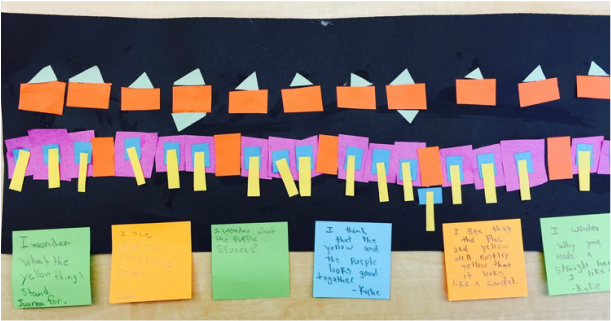 I was scheduled to use the 4th grade elementary art kit, Centennial Bridge, but I’d never used it before. I didn’t check it out with a purpose to integrate it into our current social studies or science units of study, but I was excited to try an Artful Thinking Routine that would add some depth to our discussion, and hopefully deepen students’ engagement in the lesson. I decided that I would begin by showing the photographs of the Gastineau Channel/Douglas Bridge included in the kit, and use the Think/Puzzle/Explore routine. I hoped that showing the photographs without telling any information would invite students to try to build a narrative about the history of transportation in Juneau. I displayed the photographs on my whiteboard tray at the front of the room, and asked students to look at them carefully and quietly without talking. 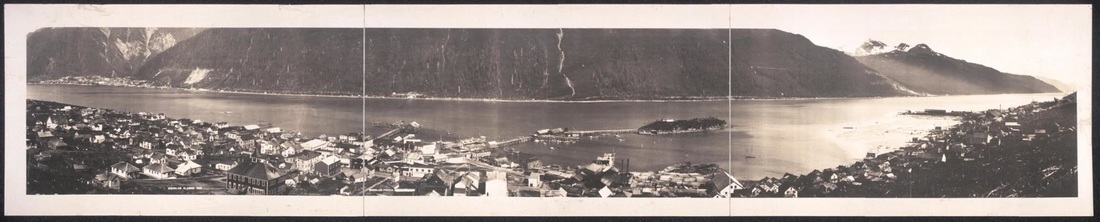 I began with the question, “What do you THINK you know about this topic?” Some of their responses:
Students seemed to understand that all of the photographs were connected, and they were telling a sequential story of the transportation used in the Gastineau channel. Then I asked, “What questions or puzzles do you have?
And the final question: "What does this artwork or topic make you want to explore?"
 Students were very engaged and excited to find out that the reason the old bridge was replaced was because it was too small for the growing population and the new bridge is larger (this could be linked to why the roundabout was built about ten years ago!) They commented on the structure of each bridge and the difference in design, wondering why the old bridge had more artistic detail. I introduced the photographs of the Centennial bridge and we compared it to the Douglas Bridge. We determined that it looks like a pedestrian bridge, which is why the art decorating the two sides of the bridge is in the footpath. We looked carefully at the symbolic images placed on either side of the bridge and thought about the difference between art that is functional (like a bridge, which has a form and a function) and the Centennial bridge, that includes style which carries symbolic MEANING. Students then created abstract bridges with 100 pieces of colored paper, creating patterns and lines. The results are as different as my students--each created their own pattern or arrangement of color and shape on the page. 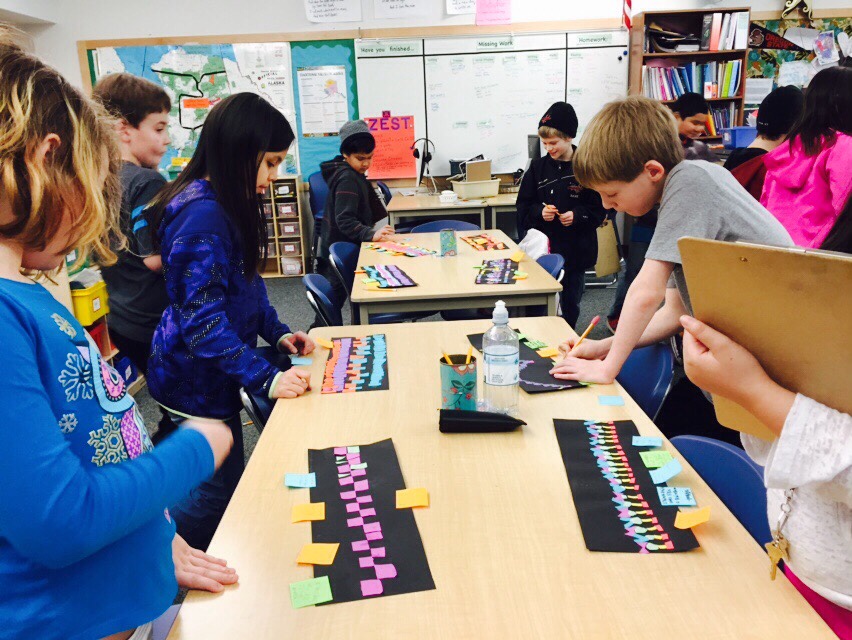 by Davin Savikko Riverbend Elementary, Kindergarten 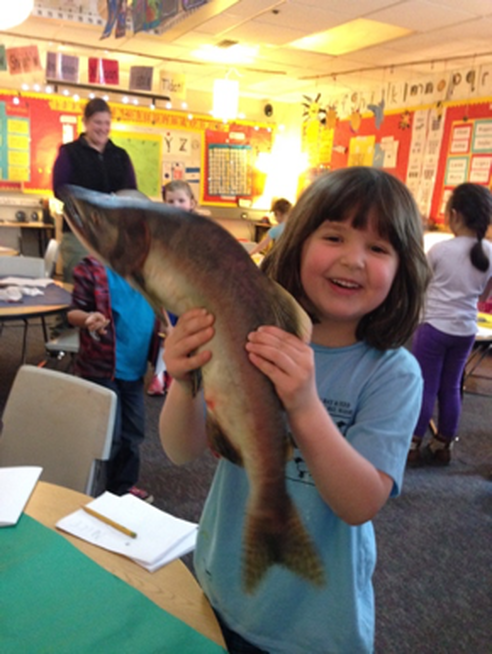 I will share the story of how I used the SEE/THINK/WONDER routine when I brought 6 salmon into my kindergarten class. I love this routine for its simplicity: What do you see? What do you think you know (in this case about salmon)? And what does this make you wonder? This routine is a great way to get my students more engaged with a piece of art – or in this case – a topic (salmon). I started out by laying a number of salmon (both Pink and King) around the room on tables. Actually, I started by giving my kids a direct order: “You can’t say ‘Ew!’ – you have to say, ‘Cool’– or something like that." (Unfortunately, that order was not as successful as the use of the SEE/THINK/WONDER routine…but it was pretty funny to hear the kids continually saying ‘Ew!’ and then have 20 other kids yell at them not to say that). Kids were then encouraged to move throughout the room to touch, draw and talk about what they see/notice about the salmon. 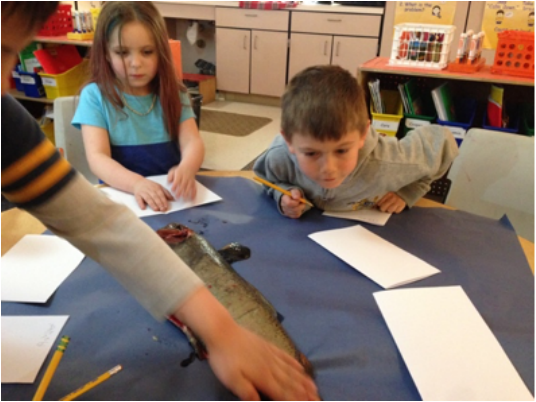 We then regrouped at the front of the room and I posed the question “What do you think you know about salmon?”. I recorded the kids thinking on butcher paper. The kid’s thoughts ranged in complexity – from simple thoughts and details: “I think tails help fish swim” and “If they don’t live in water they will die” To more in depth details: “The fin right here (points to gills) helps the salmon breathe” and “I think they (salmon) have slime on them so if they go in a seal’s mouth they can slip right out”. That is another thing I really like about using this thinking routine – it allows for multiple entry points for kids depending on their observational skills and/or prior knowledge. Some of the ‘thinking’ was very literal about what they saw from the salmon in the room: “King salmon have dots on their bodies” and other ‘thinking’ obviously came from prior knowledge the student had come in with “You can only keep a King Salmon if it’s size is big enough”. The student’s comments would often build off the comments of their peers. Sometimes it would directly contradict what a classmate had just stated – for instance, right after the claim about the gills helping a fish breathe, another student made the claim: “I think that that fin (points to rear fin) goes under their body and helps it breathe”. All thoughts were recorded by me, word for word, with no corrections or judgements. I then took a different piece of butcher paper and posed the question, “What do you wonder about salmon?” Like the “I think I know” process, some of the wonderings were related to what the students actually observed from the salmon in the room, while others were from prior knowledge or wonderings in general. “I wonder what that little fin on top does?” “I wonder how salmon can breathe under water?” “I wonder how old fish are?” After all the ‘Wonderings’ were recorded I grouped the students around me for the dissection of a few salmon. 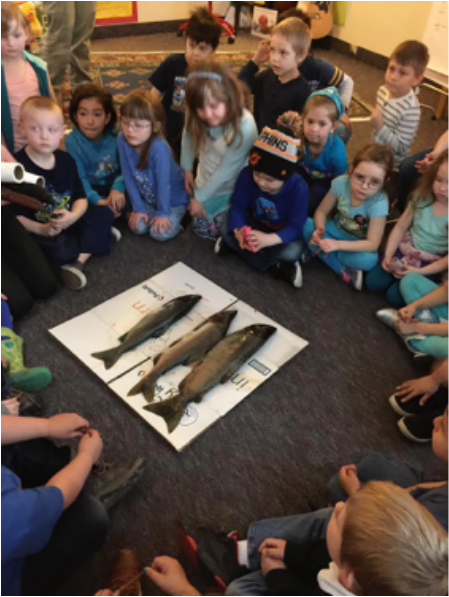 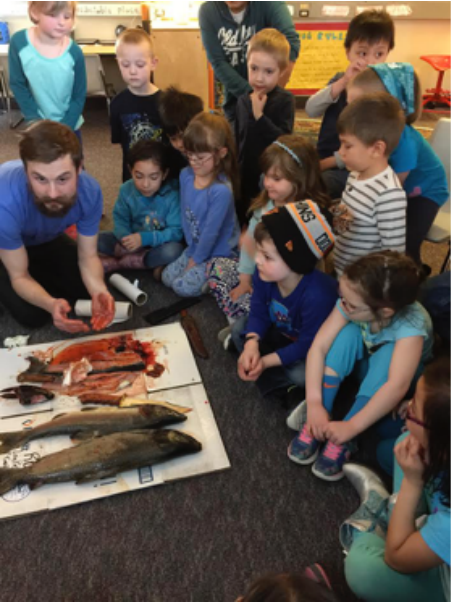 It was only at this time did I reveal/deliver any of information about salmon – a good 30 minutes into the lesson. All previous talk had been strictly kid generated. Every student in my class was engaged. How often can I say that?
The dissected salmon were then put back on tables and students were encouraged to engage in the same process we used to start the routine – touching, talking and drawing what they saw. by Maura Selenak Harborview Elementary, Kindergarten 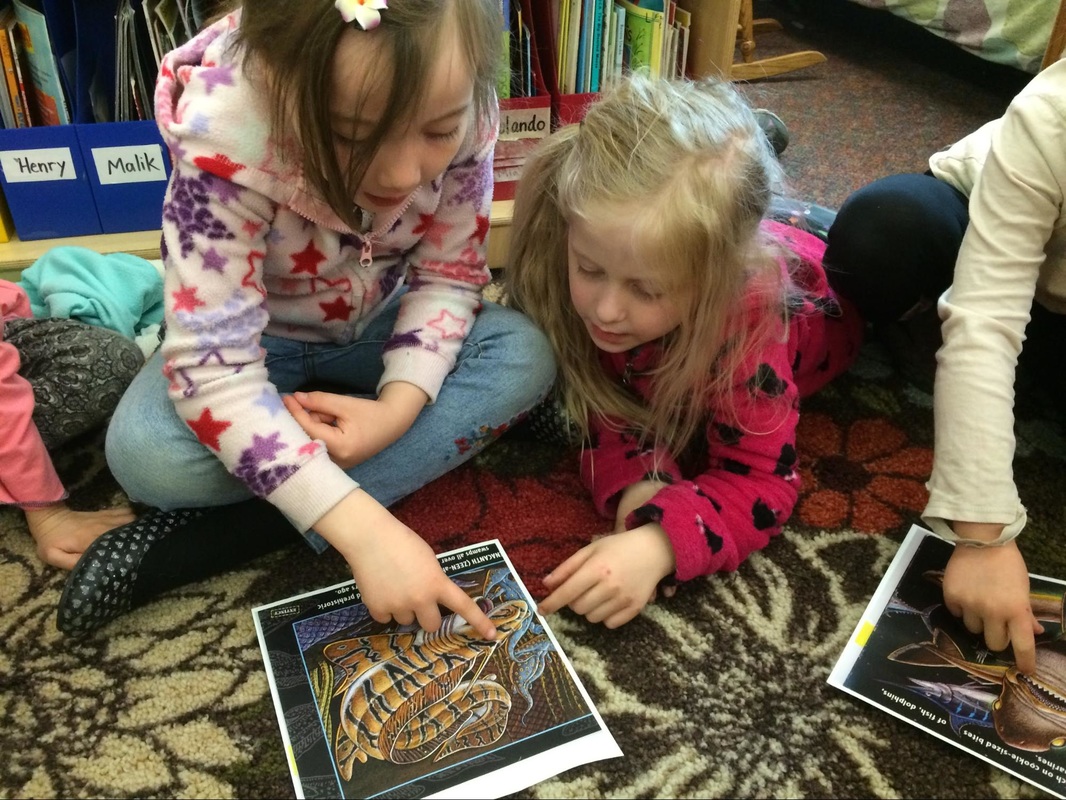 I learned a routine called Pass the Portrait at a recent inservice with Melanie Rick, an instructor from the Kennedy Center for the Performing Arts. To play Pass the Portrait, students are seated in a circle, facing a partner. Before beginning, students must show the place between them where they will be placing the piece of art (this is an important step because it helps avoid conflicts). In the game, students are taught how to “read” a portrait by discussing things like facial expression, gesture, and focal point. The teacher places a printed portrait in the predesignated spot between each pair of students. The students have one minute to discuss the picture before the teacher starts counting down aloud- “10, 9, 8, 7, 6, 5, 4, 3, 2, 1, pass….the….portrait….!” The expectation is that students will wrap up their discussion by the time the teacher gets to 1, then will pass the portrait to the next pair by the time she finishes saying “pass the portrait”. The teacher moves amongst the students during the discussions, pulling out ideas and writing them on the board to reference later. This routine quickly gets students engaged- there is art in their hands!- and discussing with one another. I used Pass the Portrait to teach my kindergartners the routine and expectations for the game- they are seated, they are talking in quiet voices, they are expected to work with anyone in the class, they finish their conversation by the time I get to 1, and they pass the portrait clockwise. After teaching them this routine, I realized the sky was the limit! For example, we used the routine at the beginning of the Ray Troll art kit. I printed out 15 images of Ray Troll Fish. We began the lesson by looking at one piece of exemplar art on the board and identified colors, lines, patterns, and shapes. We were then ready to play “Pass the Artwork”. We used the exact same routine as Pass the Portrait, except students were looking at Ray Troll images, and they were picking out colors, lines, patterns, and shapes. The discussions were rich, and when it came time for students to create their own artwork, they were inspired and had concrete ideas of what kinds of lines, shapes, colors, and patterns they could use.  In another instance, I used the Pass the Portrait routine at the beginning of the Rainbow Flower Garden Art Kit. The kit comes with many colorful artificial flowers. We used used exemplar art to identify flower parts before students played “Pass the Flower” with the artificial flowers. The objective for their discussions during Pass the Flower was to identify flower parts (stem, leaves, flower) and describe the flower (it has 5 petals, it is colorful, it has one long green leaf, etc.)
by Joanna Hinderberger Gastineau School, 1st Grade  Before going into one of my Artful Teaching lessons, I want to take a moment to admit how impressed I am with this new way of teaching. As I started integrating Artful Teaching into my practice, I realized how important, yet basic and easy it is to do. Honestly, I must admit that I am a little shocked that I have not always taught this way. I had completely overlooked the importance of explicitly teaching kids how to think. I expected this to be a skill that kids would just know what to do when I said, “think about it.” Now, I have learned that by giving my students the tools they need to “think,” they have become much more critical thinkers and incredibly curious about their world. My classroom culture is now built around student thinking. Students have learned to critically think about new topics when I introduce them by using the skills of:
Okay, enough chit chat, let’s get into one of the lessons. Sea Week was one specific area that I wanted to focus on, and I especially wanted to integrate art, science, and writing. I have found that for first grade students, it can be challenging to take another’s perspective. This is something that we work on for developing social skills. I first chose to conduct an informal assessment to gain some information on what the students already know about low tide beaches and creatures in Southeast. I also wanted to figure out what it was that they were interested in learning about. In order to do this, I gathered students on the carpet and explained that we would be starting a new science unit on sea creatures. I used the Artful Thinking Routine Step Inside as a way for the children to demonstrate what they already know about the beach. I had them close their eyes and imagine walking off the bus, arriving at the beach, and exploring the low tide. I had them imagine what the beach would sound like, look like, feel like, and smell like. After allowing students to use their imaginations, I had them go to their seats and draw and write about each of the senses that they think they would experience at the beach. I prepared student books using two pieces of paper that have lines on the bottom and blank space on the top for drawing. The papers were folded in half so that there were four spaces for four senses. I labeled each page for each sense (look, smell, feel, and sound) with an icon to help the students stay focused on the task. I have found that scaffolding thinking into a focused area can often encourage more writing than given a broad topic. I asked the students to write their thinking, meaning any thing that they think is true, as well as any questions or wonderings they might have. Students were given time to write and draw to express what they already think they know to be true and then ask questions that I could use as a way to plan.   by Tracy Goldsmith Dzantik'i Heeni Middle School My 8th grade Language Arts class students studied the Holocaust. They were assigned different Holocaust novels to read and they participated in literature circles using those novels. We started the unit by using the Step Inside Artful Thinking Routine with this image; 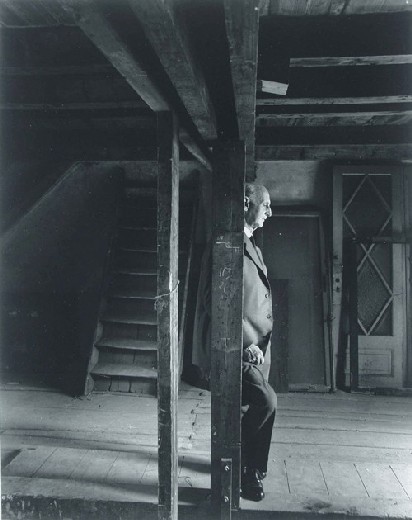 This is an image of Otto Frank, on the opening day of the Anne Frank House as a museum in Amsterdam. I asked students to stand up and quietly place themselves into the same position as the person in this portrait. While they quietly, stood in position looking at the image, I asked them to image what this person might be thinking or feeling. I wanted them to come up with a story about this picture and this man. They stood silently for one minute and then they had to write a journal entry answering the same questions. Some student responses are below:
The unit involved many different activities related to the Holocaust. One resource we used extensively was the United States Holocaust Memorial Museum website (www.ushmm.org). To extend the Artful Thinking routine of “Step Inside,” the students were assigned a portrait and first person narrative project. They started by finding one victim or survivor whose story they wanted to explore more on the USHMM website. There is a link on the website that shows ID cards with pictures and information about victims and survivors. After finding a person that they wanted to study more, students had to read the information about them and then turn that into a first person narrative. This first person narrative would be read out loud to the class later in the unit. The activity of writing in first person really stretched their understanding of what an individual was experiencing during the Holocaust. Being able to read it out loud to an audience, made that story come alive. Many students were emotionally touched by the narrative readings. 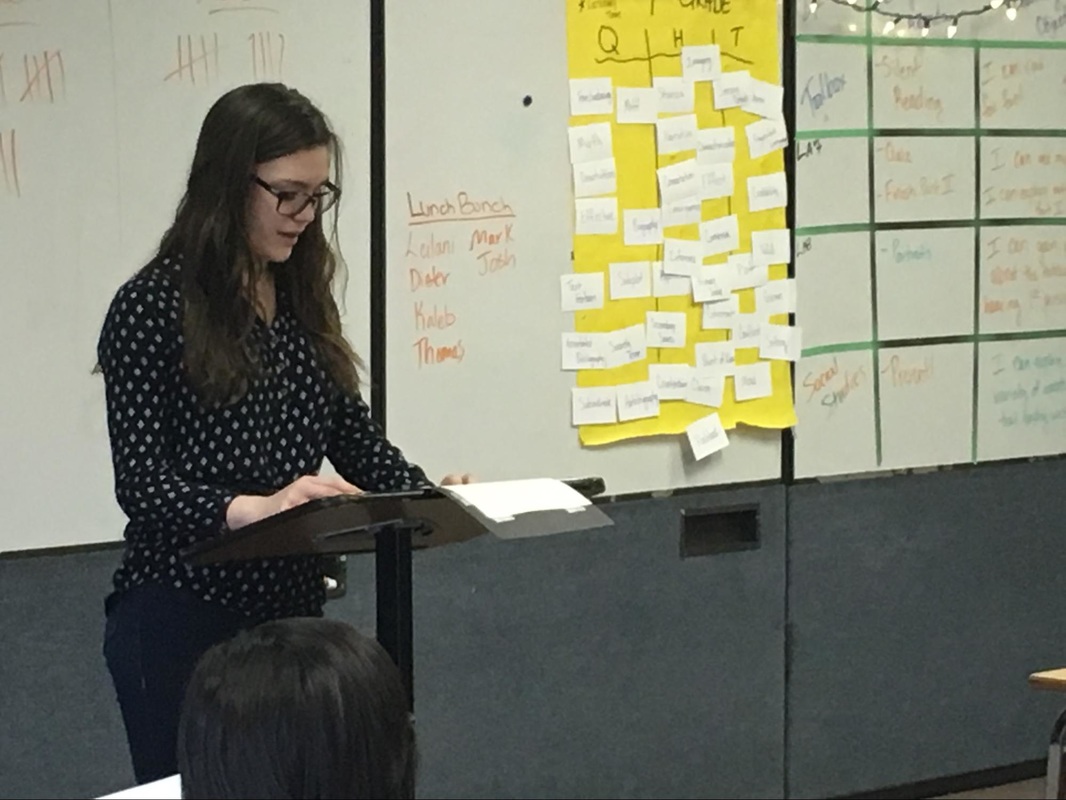 Student reading her first person narrative. |
ArtStoriesA collection of JSD teachers' arts integration classroom experiences Categories
All
|


 RSS Feed
|
|
Artful Teaching is a collaborative project of the Juneau School District, University of Alaska Southeast, and the Juneau Arts and Humanities Council.
|